



Git Beyond Version Control!
Git has mighty powers beyond version control! This article will explore how it can help developers in surprising ways. While we will be providing examples in an Angular codebase, these Git concepts are universally useful for any project. Learn how to understand code change origins, effectively manage multiple repositories, and discover practical tips to enhance your local Git workflow as we unlock more of Git's potential.
Gitting Started
The Example Codebase
This article uses NgRx as an example repository. It is well known, has strong commit message hygiene, and is a pretty reasonable size. Feel free to clone it to your computer and follow along if doing so is helpful. Having said that, if you have a project that you’re working on, I highly encourage using that instead and customizing the given example commands to your particular project for a more impactful learning experience!
If you’d like to follow along:
- Change to an appropriate directory to store the repository and execute
git clone git@github.com:ngrx/platform.git. Move to the project’s directory -cd platform. - Ensure you are on a supported Node version. This can be found in the
.node-versionfile in the root of the repository, which as of this writing is22.16.0. An easy and popular way to manage node versions is nvm (Node Version Manager) - see the nvm installation instructions. - Install the codebase’s dependencies. As of this writing, this is done via
pnpm install— see theREADME.mdon the root directory to ensure this is still the case. If you don’t havepnpm, you can install it by following any of the pnpm installation instructions. I’ve had good luck installing it via the Corepack route.
Navigating Git’s Output
The Git CLI uses less to display text. Here are a few quick tips for using it while reading this article:
- Type
forbfor Page up / Page down (think “forward” and “backward”). - To search for text, type
/, the phrase you’d like to find, then press Enter. Pressnto jump to the next result, andNfor the previous one. This feature uses regular expressions, so you can search for something like “^commit”, for example, to quickly jump to the next/previous commit when browsinggit log. - Type
qto exit the program.
Snippets in this article
When representing things that should be typed into the shell, snippets will have lines start with a ”$”. This is just to keep them visually separate from commands’ output - don’t enter them if copy+pasting the text into your own terminal.
Gitting good
Finding the “Why” of changes with better history searching
I’m quite a believer of the idea that knowing the “why” of code changes is just as important as the “what”, and sometimes even more so. This line of thought is key for avoiding introducing new bugs when making changes. After all, if someone coded something, they did it for a reason!
The well-known git blame (similar to the “annotate” feature in IDEs) has some issues - particularly, it only shows the most recent commit on each line. This can be quite misleading since a refactor or prettier (a code formatting tool) run could obfuscate where a particular change originates when using this feature. Let’s talk about how to get by this.
$ git log --patch -G'Some string' path/to/some/fileThis reveals commits where the given string is added or removed, and is easily my most commonly used option for finding the history of changes. It is surprisingly efficient in that I’d sometimes assume that the string I’m searching for would have many results, yet upon searching in this way, I’m able to find the change I’m looking for just a few commits in.
Let’s break down the command’s flags:
--patch: Shows the diffs of the commits’ changes-G'Some string': Search for commits where the given regex string is either added or removed.
Also of note is -S'Some string', which shows commits where there’s a change to the total number of times the given string appears in a file.
Now let’s play with these flags to better understand how they work.
We’ll start by finding some information about the serialize option in the NgRx devtools file. Execute the following and observe the results:
$ git log --patch -G'serialize' modules/store-devtools/src/extension.ts

commit 55a0488c7e456d74affa2354a12cc20db12e5f38
Author: Alex Okrushko <alex.okrushko@gmail.com>
Date:   2018-06-13 18:04:06 -0400

    feat(StoreDevtools): Allow custom serializer options (#1121)
---
 modules/store-devtools/src/extension.ts | 8 ++++++--
 1 file changed, 6 insertions(+), 2 deletions(-)

diff --git a/modules/store-devtools/src/extension.ts b/modules/store-devtools/src/extension.ts
index dfc3140a..67668153 100644
--- a/modules/store-devtools/src/extension.ts
+++ b/modules/store-devtools/src/extension.ts
@@ -4,7 +4,11 @@ import { empty, Observable } from 'rxjs';
 import { filter, map, share, switchMap, takeUntil } from 'rxjs/operators';

 import { PERFORM_ACTION } from './actions';
-import { STORE_DEVTOOLS_CONFIG, StoreDevtoolsConfig } from './config';
+import {
+  SerializationOptions,
+  STORE_DEVTOOLS_CONFIG,
+  StoreDevtoolsConfig,
+} from './config';
 import { LiftedAction, LiftedState } from './reducer';
 import {
   sanitizeAction,
@@ -37,7 +41,7 @@ export interface ReduxDevtoolsExtensionConfig {
   name: string | undefined;
   instanceId: string;
   maxAge?: number;
-  serialize?: boolean;
+  serialize?: boolean | SerializationOptions;
 }

(Further output truncated)
We see here the most recent commit where lines with the string “serialize” was added or removed, with the diffs shown. The bottom of the snippet shows that | SerializationOptions was added in the commit. If you scroll further down, you can see the history of commits of such changes, as well as the commit messages that explain why each were done. Many even have the GitHub issue numbers. The commit shown above is issue #1121, and you can check that issue’s page for further context of the change. This is how we find the “why!”
Next, try using the S flag instead of G:
$ git log --patch -S'serialize' modules/store-devtools/src/extension.tsAs mentioned earlier, rather than showing commits where “serialize” was added or removed, it shows commits where the amount of times it appears in the file changes. This is very good for finding the origin of code features rather than when features were modified.
Recommended further reading
There are many such features offered by git log - have a look at its documentation or execute man git-log and read through the options. In particular, review the -L flag, which allows you to track the history of a given range of line numbers.
Bisect for bug finding
I love git bisect. It is one of my favorite strategies for quick bug troubleshooting. Initially given a commit before a bug starts and one after, git bisect is able to help find which commit is problematic by using a common search strategy. This makes it particularly effective if, for example, a bug was not occurring in a known previous release. A huge bonus is that since we get the commit where the bug started, we also get the “why!” This helps us fix the bug without completely undoing the change that the commit was intending to make in the first place.
This feature works by letting Git switch you around to specific commits where you tell it whether or not a bug or feature is present on that commit. This is usually done by you actually running the app and checking it for yourself. As you give Git this information, it uses a binary search algorithm to efficiently approach closer and closer to the source of the bug or feature until it has been finally narrowed down to just a single commit.
The best way I know how to fully explain this is by example, so let’s start.
In its simplest form, there are two approaches to using this tool: Marking commits as old/new or marking them as bad/good. In both cases, you are identifying a given commit as happening either before or after the bug or feature. These marks give Git hints on which commits need to be investigated in order to find what you’re looking for. If you are attempting to find when a particular feature was implemented, you’d use old/new, and if you are looking to find when a bug started happening, go for bad/good. For our example, we are going to find when a particular fix was implemented: @ngrx/signals: Reduce console.warn noise in signals tests #4998. This is perfect for our example because unit tests are quick to set up, run, and verify. Of course, while we could easily scroll to the bottom of the page to find where GitHub tells us which commit it was fixed in, let’s not spoil it for ourselves! Instead, we will find when the fix was implemented using git bisect. Begin the process via:
$ git bisect startWe are nearly ready to start marking commits. Which commits to mark is typically decided by thinking about something like a known time when a bug or feature wasn’t present (for example, one might remember that it worked as expected two releases ago). If all else fails, one can check out commits days or months in the past, testing until they find some commit before the bug or feature is present. In our case, our noisy console warnings issue has indeed been fixed since the issue was posted, so we know that the commit that the main branch points to contains the fix. While writing this article, the main branch pointed to 642bcba1621eea341e9b6ea6d1361bfd936f3120, so if you are following along and would like to ensure that you see what I see, you can execute:
$ git switch --detach 642bcba1621eea341e9b6ea6d1361bfd936f3120Before we mark our commits, let’s see how the tests act in the present day, after the fix was implemented. Run the Signals tests:
$ pnpm exec nx test signalsThe test runner should show a nice, clean test output without the excessive amount of warnings that the author of the issue reported.
Since we are attempting to find when something was added (the bugfix), we will be using the old/new markings. Execute the following to mark our first commit:
$ git bisect new

status: waiting for good commit(s), bad commit known
We mark this commit as “new” since it is a commit that is newer in relation to when the fix was applied — in other words, it’s closer to the present day. Note that old/new are just aliases for bad/good, and they were added simply to let the kind of feature-finding that we are doing now make a bit more grammatical sense. This is why the resulting message from our command is mentioning “good” and “bad” commits.
Next, we will find a commit that existed before the fix was implemented. We know that the bug was happening when the GitHub issue was created, so we can be confident that commits on or before that time (Nov 16, 2025) were before the fix happened. Find and switch to a commit that happened on or before that day via:
$ git log --oneline --until 2025-11-16 --max-count=1

50fa5513 docs(www): add contributors page (#4990)

$ git switch --detach 50fa5513

$ git show --no-patch

commit 50fa5513ba7e5cb43a0f687508373ab582ff6a9a (HEAD)
Author: DuskoPeric <dule@teretane.net>
Date:   Mon Nov 10 20:09:21 2025 +0100

    docs(www): add contributors page (#4990)

    Closes #4987
We see that we are now on a commit from just a few days before the issue was created. It will help to determine for ourselves what we are looking for, so execute the tests to see what the noisy console messages looked like before the issue was fixed. We are going to run it slightly differently this time - we will run pnpm install before executing the tests since the dependencies may have changed on this commit, disable the Nx Daemon to avoid potential issues with it for this demonstration, and disable the Nx cache to ensure that the tests run on a clean slate:
$ pnpm install && NX_DAEMON=false pnpm exec nx test signals --skip-nx-cacheThis time, there are a lot of error messages similar to the following:
stderr | spec/signal-store.spec.ts > signalStore > withState > does not create signals for optional state slices without initial value
@ngrx/signals: patchState was called with an unknown state slice 'y'. Ensure that all state properties are explicitly defined in the initial state. Updates to properties not present in the initial state will be ignored.
Let’s mark this one as “old” since it is a commit that is older in relation to when the fix was applied — in other words, it is further from the present day.
$ git bisect old

Bisecting: 17 revisions left to test after this (roughly 4 steps)
[d8c4d844e24f35ba92443769a47dbc000f11b22b] refactor(eslint-plugin): cleanup jest usages (#5034)
We have now marked a new and an old commit, and Git has switched us to a different commit automatically this time. The bisecting process begins! Just like we did before, run the tests and observe whether the excessively logged messages occur. Mark the commit accordingly. Keep doing this until Git tells you which commit applies the fix!
I’ll cut the test output from the following snippet to keep things short and readable, and will describe the result instead:
$ pnpm install && NX_DAEMON=false pnpm exec nx test signals --skip-nx-cache

(The output shows the error messages)

$ git bisect old

Bisecting: 8 revisions left to test after this (roughly 3 steps)
[213a8fea5fa5acbe5a41be9f01843f6552f48a22] refactor(effects): migrate unit tests to Vitest (#5042)

$ pnpm install && NX_DAEMON=false pnpm exec nx test signals --skip-nx-cache

(The output shows the error messages)

$ git bisect old

Bisecting: 4 revisions left to test after this (roughly 2 steps)
[adf4a85b16019db1ad9233940c50f34d19cfa296] ci: fix main build (#5043)

$ pnpm install && NX_DAEMON=false pnpm exec nx test signals --skip-nx-cache

(The output does *not* show the error messages)

$ git bisect new

Bisecting: 1 revision left to test after this (roughly 1 step)
[ee69ba086f7fae33c88eae1d358bc76d46e6e562] refactor(router-store): migrate unit tests to Vitest (#5035)

(The output shows the error messages)

$ git bisect old

Bisecting: 0 revisions left to test after this (roughly 0 steps)
[ae73be57db57c90902ce3cfbc3b1c3b2c874f78a] refactor(signals): Remove noise from `console.warn` in tests (#4999)

(The output does *not* show the error messages)

$ git bisect new

ae73be57db57c90902ce3cfbc3b1c3b2c874f78a is the first new commit
commit ae73be57db57c90902ce3cfbc3b1c3b2c874f78a
Author: Rainer Hahnekamp <rainer.hahnekamp@gmail.com>
Date:   Sun Dec 7 16:55:51 2025 +0100

    refactor(signals): Remove noise from `console.warn` in tests (#4999)

    Closes #4998

    Co-authored-by: Marko Stanimirović <markostanimirovic95@gmail.com>

 modules/signals/rxjs-interop/spec/rx-method.spec.ts |  3 ++-
 modules/signals/spec/signal-method.spec.ts          |  3 ++-
 modules/signals/spec/signal-store.spec.ts           | 15 ++++++++++---
 modules/signals/spec/state-source.spec.ts           |  1 +
 4 files changed, 14 insertions(+), 8 deletions(-)
On that final commit marking, we see that it names a commit as the first new commit, then displays a summary of it. That commit message is looking promising! Let’s have a look at the bottom of the GitHub issues page and see if we’ve landed on the correct commit:
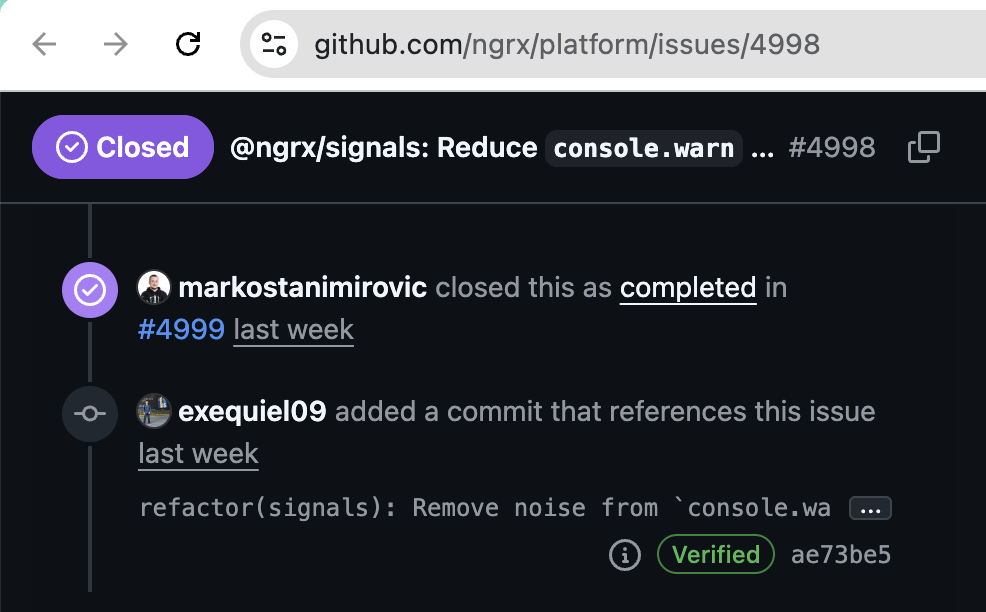
We did it! That’s the correct one!
Remember: We searched for the fix for a bug here. If you are looking for a commit where a bug starts, it might make more grammatical sense to use bad/good - purely your preference. You’d mark a commit as “bad” when a commit has the bug (since bugs are bad!), and “good” when it does not.
Recommended further reading
git bisect offers options to further optimize how quickly you can find commits. See the docs or execute man git-bisect. Make sure you read up on the following sections:
- “Bisect log and bisect replay”: How to recover from mistakes such as miss-marking.
- “Avoiding testing a commit” and “Bisect skip”: How to handle untestable commits (e.g. a commit that doesn’t build and serve successfully).
- “Bisect run”: Using a script (such as a unit or e2e test) to automatically mark commits until it finds your target!
Git hooks for automation
Automation is key when it comes to speed and focus. For example, Prettier makes formatting barely a conscious thought, allowing a developer to focus more on solving the issue without taking up the extra time. What about more complicated tasks, though? That’s where Git Hooks come into play. These allow you to execute almost any functionality you can imagine after many different kinds of git actions.
Have a look inside almost any git repository’s .git/hooks directory. You will see a few *.sample files. These are shell scripts with heavy commenting to explain what is going on - they are quite a good reference. Note how these files are named, minus their .sample extensions. The name of these scripts determine when each is executed. For example, pre-commit runs right before a commit is made.
There are a few ways to handle these hooks: Locally, repository-tracked, or both.
Local-only hooks
Let’s start with setting up a local hook. Note that if you are on a Windows machine and would like to follow along, it would be easiest using something like Git for Windows’s Git BASH or Windows Subsystem for Linux. This will be a simple hook that attempts a build which, upon failure, prevents commits.
We won’t be using the Nx repository for this one since it already implements hooks. Instead, we will create a new Angular project in order to better learn what this tool is all about, and how to use it without other dependencies.
First, we create our test project. Change to an appropriate directory to add it, then:
$ ng new --defaults hooks-test

$ cd hooks-test
Next, we create our pre-commit file:
$ echo '#!/bin/sh' >> .git/hooks/pre-commit

$ echo 'NG_CLI_ANALYTICS="false" npm run build' >> .git/hooks/pre-commit
And then we need to set the file as an executable:
$ chmod +x .git/hooks/pre-commitNow let’s add something that would make the type checker fail and attempt a commit:
$ echo 'Let the Dragon ride again on the winds of time' >> src/main.ts

$ git commit -am'Testing git hooks'
You’ll see that the build will run and fail, and git log will show that your commit did not get added. You may also note the lack of feedback for this — when making hooks, consider adding such error messages to your hook scripts. That could look something like this:
#!/bin/sh

NG_CLI_ANALYTICS="false" npm run build

if [ "$?" -gt "0" ]; then
    echo "Commit blocked due to pre-commit hook: build failed"
    exit 1
fi
This will make it far more clear why commits don’t go through. Note how we manually call exit 1 — this tells the hooks mechanism to not allow the commit to progress. If you don’t want to block commits in this way and let your hooks act more as warnings, you can exit 0 instead. You can always override local hooks and let the commit complete with the --no-verify flag like so:
$ git commit --no-verify -am'Hook override test'This time, the commit is allowed. If you are looking for a non-bypassable way to do such things, server-side enforcement such as an “on: push” Github workflow is the way to go.
I often find myself using local hooks such as these for personal workflow optimizations, including stopping pushes to certain branches, disallowing myself from pushing code with TODO comments, running Prettier, or automatically adding Jira story numbers to commit messages via prepare-commit-msg.
Before we continue, undo the “Hook override test” commit:
$ git reset --hard HEAD^Repository-tracked hooks
What should we do if we want to have such hooks be shared with the team? For this, we can use the git option core.hooksPath. By setting this to a directory within the repository, these can be checked in and modified like any other file. Execute the following to move our hook to a hooks directory at the root of our repository and tell git where to find it:
$ mkdir hooks \
    && mv .git/hooks/pre-commit hooks \
    && git config core.hooksPath 'hooks' \
    && git add . \
    && git commit -m'Add hooks'
Make a change to some code that would cause your hook to fail and attempt a commit:
$ echo "Programmer: A machine that turns coffee into code." >> src/main.ts

$ git commit -am'Testing checked-in hooks'
It should be rejected as it was before. Let’s undo that change before we continue:
$ git restore .From here, we can use the NPM prepare lifecycle script to let newly-cloned repository copies automatically start using your new hooks directory without users having to check documentation and manually execute the command. Add the following line to the "scripts" object of your package.json file:
"prepare": "git config core.hooksPath 'hooks'"Now, future contributors to the codebase will automatically have this option set for them when they npm install.
Local and repository-tracked
Perhaps you’d like to have hooks checked in to the repository while keeping the benefits of having local hooks for your own personal workflow. The way to go about this depends on whether the hook you’d like to use is already checked in to the repository.
If the hook is not already present, you can add its filename to a global .gitignore file. If you don’t already have one, set a location for the ignore file, then add the desired hook’s filename to it:
$ git config --global core.excludesfile '~/.gitignore'

$ echo pre-commit >> ~/.gitignore
Now you can add a pre-commit to your hooks directory without Git tracking it.
If the hook is already present and tracked, this may require some cooperation with the team. You can add a line to your checked-in hooks that scans to make sure that some git-ignored file exists before running it. As an example, we can modify the .gitignore to ignore files that have a .local extension, then create a local-only hook:
$ echo 'hooks/*.local' >> .gitignore

$ echo 'echo "I am a local-only hook!"' >> hooks/pre-commit.local

$ chmod +x hooks/pre-commit.local
Now, add this to the end of your hooks/pre-commit:
if [ -f hooks/pre-commit.local ]; then
    hooks/pre-commit.local

    if [ "$?" -gt "0" ]; then
        echo "Pre-commit hook: build failed"
        exit 1
    fi
fi
Make a commit:
$ git commit -am"Local hook test"Upon making the commit, you should see “I am a local-only hook!” near the end of command’s output.
Recommended further reading
The hooks documentation or man githooks contains further valid file names and parameters, and remember that you can review the *.sample files in the .git/hooks directory!
Gitting it done
I hope this has demonstrated some of the many ways that Git can improve your experience as a developer. For this session, we discussed:
- How efficient history searching can help find the “why” of code changes and help mitigate intended changes.
- Using Git’s Bisect feature to help find when bugs were merged into the codebase, and how this can help find the “why” as a bonus.
- Hooks’ ability to provide automation when taking different kinds of actions in Git and some small suggestions for their usage.
If you are interested in further Git knowledge, make sure to check out Ron Newcomb’s “Git Questions, Good and Bad,” which explores common questions about the subject. I highly suggest reading some of our various articles on testing, which go quite well with Bisect’s Run feature. Finally, great examples of working with terminal-based tools are available in our CLI category of articles.
Keep diving in to Git, and I’m sure you’ll be quite happy with the cool things you’ll find! There are many hidden treasures to be found.