


The Wonderful Lives of Angular Components
A deep dive into the Angular component lifecycle (construction, initialization, change detection, and destruction) and the lifecycle hooks that let you handle each phase.
It may come as a surprise, but even code has a cycle of life!! That is the topic here today, the lifecycle of Angular components. Lifecycle, you ask? Every Angular component instance “lives” and “dies” going through a particular cycle of events. Some of these events occur only once, others occur many times over the life of the component instance.
Every component is birthed through the construction & initialization process, lives through change detection cycles, and eventually dies through destruction. Each of these events may be handled by the developer in each component to perform a variety of initialization, change and destruction tasks.
Handling a Lifecycle Event
As with most things with Angular, handling a lifecycle event is very straight-forward. Each lifecycle event is defined by a typescript interface, such as OnInit , that a component or directive may implement. Each component or directive may implement each of the angular lifecycle interfaces. These interfaces each define a method starting with the letters ng, such as ngOnInit when implementing the OnInit interface:
import { OnInit } from '@angular/core';

@Component({
  template: `<div></div>`
})
export class LifecycleComponent implements OnInit {
  ngOnInit(): void {
    console.log('Component Initialized!');
  }
}
Each lifecycle event interface may be imported from the @angular/core module. In addition to these interfaces and their methods, there is one additional aspect of a component’s lifecycle: the constructor!
The Angular Component Lifecycle
The life of an Angular component is a highly structured one. From their birth through construction and initialization, to their runtime through change detection, to their eventual death and destruction, there is a specific order and structure to their lives.
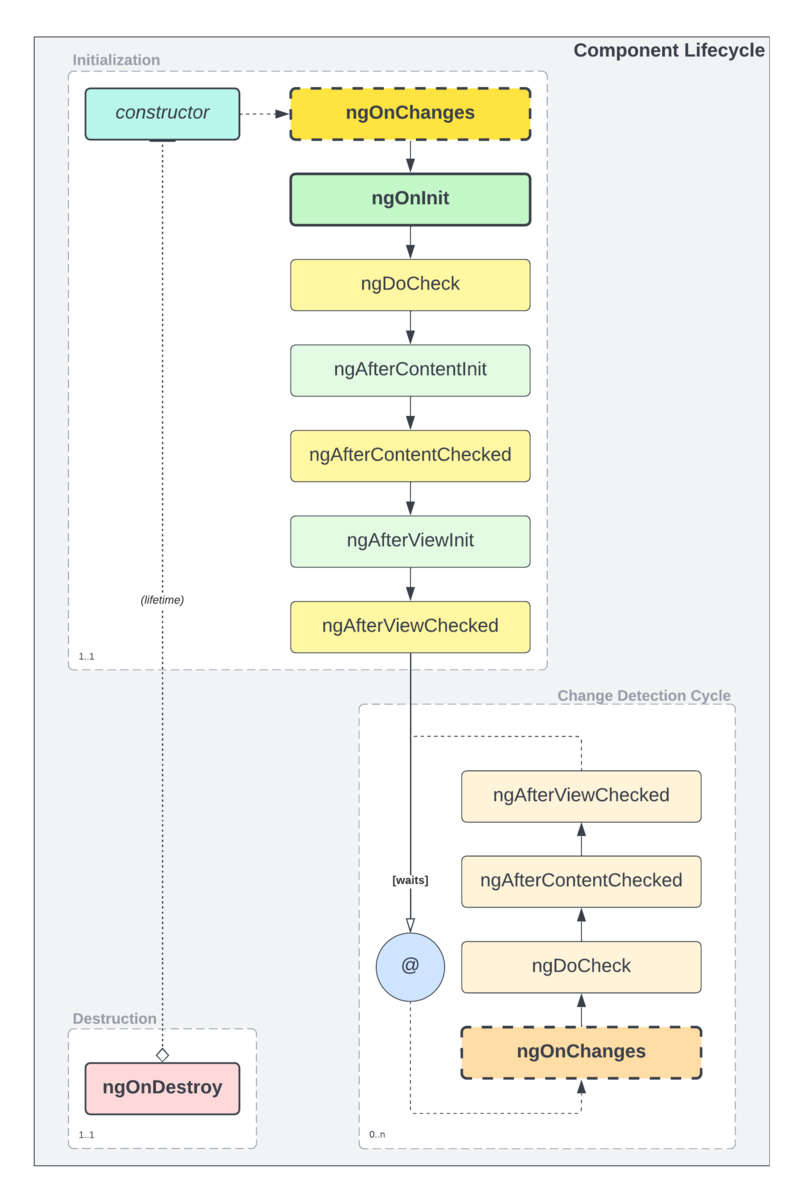
The very first thing that happens with a component is its construction, and this marks the earliest opportunity to perform any actions with a component, even before initialization. Some things may only be done during construction, such as handling certain aspects of routing to the component.
After construction, the initialization process occurs, which involves a number of events. Some of these events can reoccur during the subsequent period of change detection cycles, while others are one-time events that only occur during initialization.
The change detection cycle represents the adult life of an Angular component. This cycle may occur many times during the component’s lifetime, and will occur whenever the inputs of the components change. This cycle is usually where most developers will invest some effort in managing the lifecycle of their components.
Finally, as a component approaches deaths door, the final event of their lifecycle will occur, as part of the process of destruction.
Therein lies the nature of the lives of Angular components! Construction to Initialization, to Change Detection and eventual Destruction.
Changing and Checking
If you spent some time examining the diagram above, you may have noticed a particular term: check. In Angular, there are two key aspects of the component lifecycle: changes, and the checking of bound properties to determine what changes have occurred. Actual change detection is usually actually performed within the “checking” process, what Angular actually calls its change detection. When a change occurs, those changes are “checked.”
Angular’s default change detection mechanism is to check if bound property values have changed referentially (or by value for primitives). When the reference has changed, the bound property (i.e. @Input) has changed. This is determined by keeping track of previous values as well as current values.
Custom checking algorithms that check for changes in other ways can be performed as part of the Angular component lifecycle via the DoCheck handler, as can scenarios that Angular simply cannot check on its own. We will get into this more later on in the article.
Drivers
There are certain things within Angular that will drive each part of the component lifecycle. These include the Angular bootstrapping process, which will construct any bootstrap components (usually AppComponent), routing, and dynamic changes to views which will be driven by the Angular view engine itself. Expanding the above diagram to include the various driers of the component lifecycle, we end up with this:
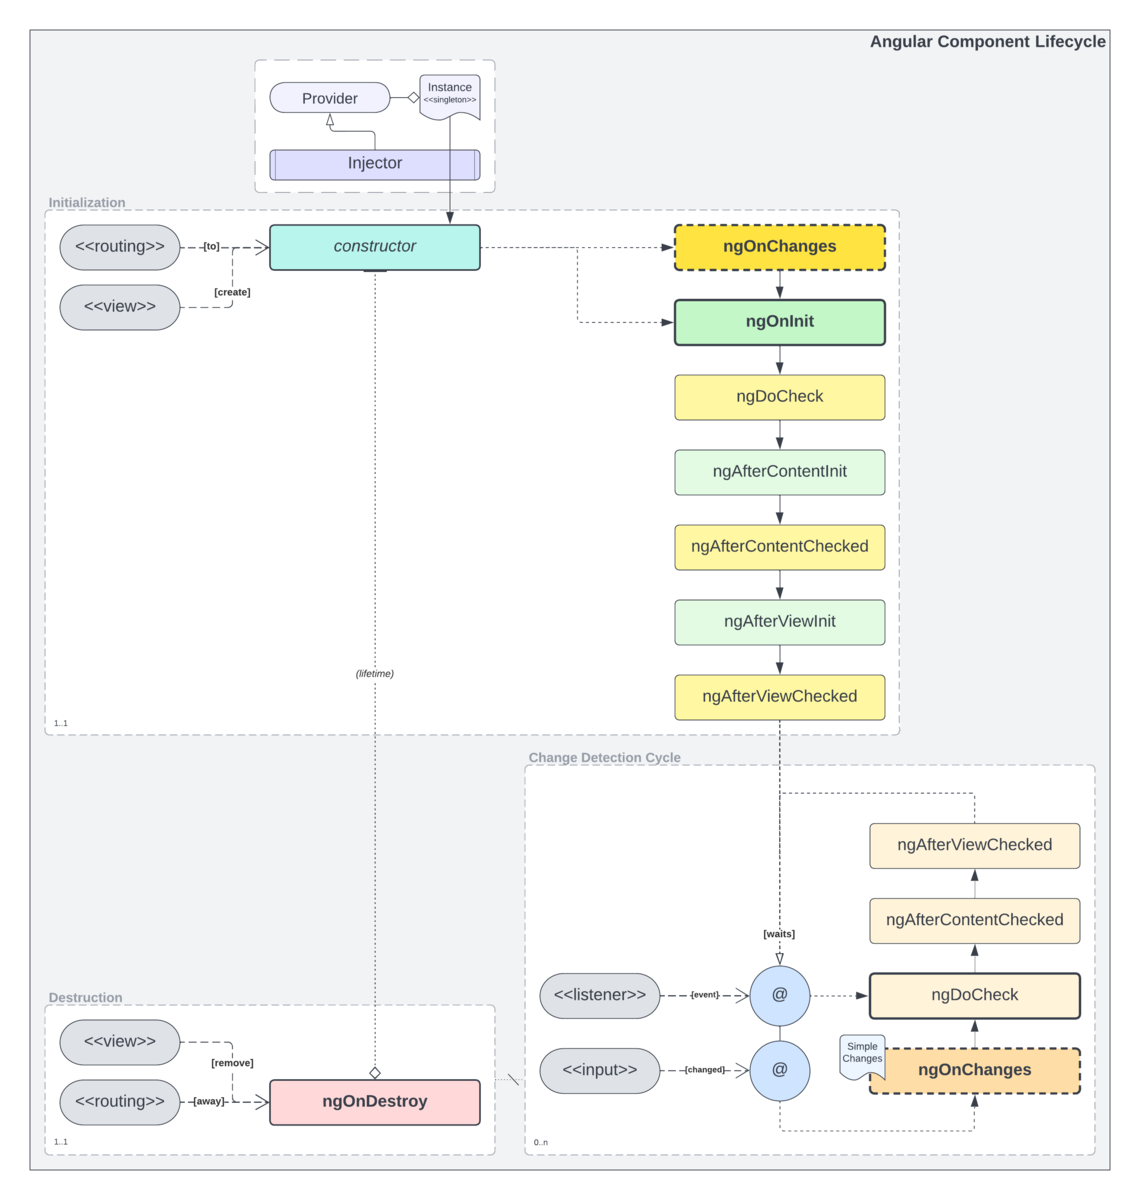
Dynamic changes themselves are often managed by special directives called structural directives, which may augment the actual structure of the HTML document. Such directives included things like *ngIf, or the *ngSwitchCase structural directive that works in concert with the [ngSwitch] directive.
It is also possible to develop your own structural directives which may result in other dynamic changes to the document and component instances.
Birth: Component Construction
The earliest opportunity for an Angular developer to tap into the lifecycle of their components is within the constructor. This is the birth of any component, the moment its conception gives rise to digital life!
In some cases, the constructor is the only place to handle certain aspects of a component’s early phase of life. At the same time, there may be some aspects of managing a component’s initialization cycle that must be done later in the process.
export class MyComponent {
constructor(private readonly store: Store) {}
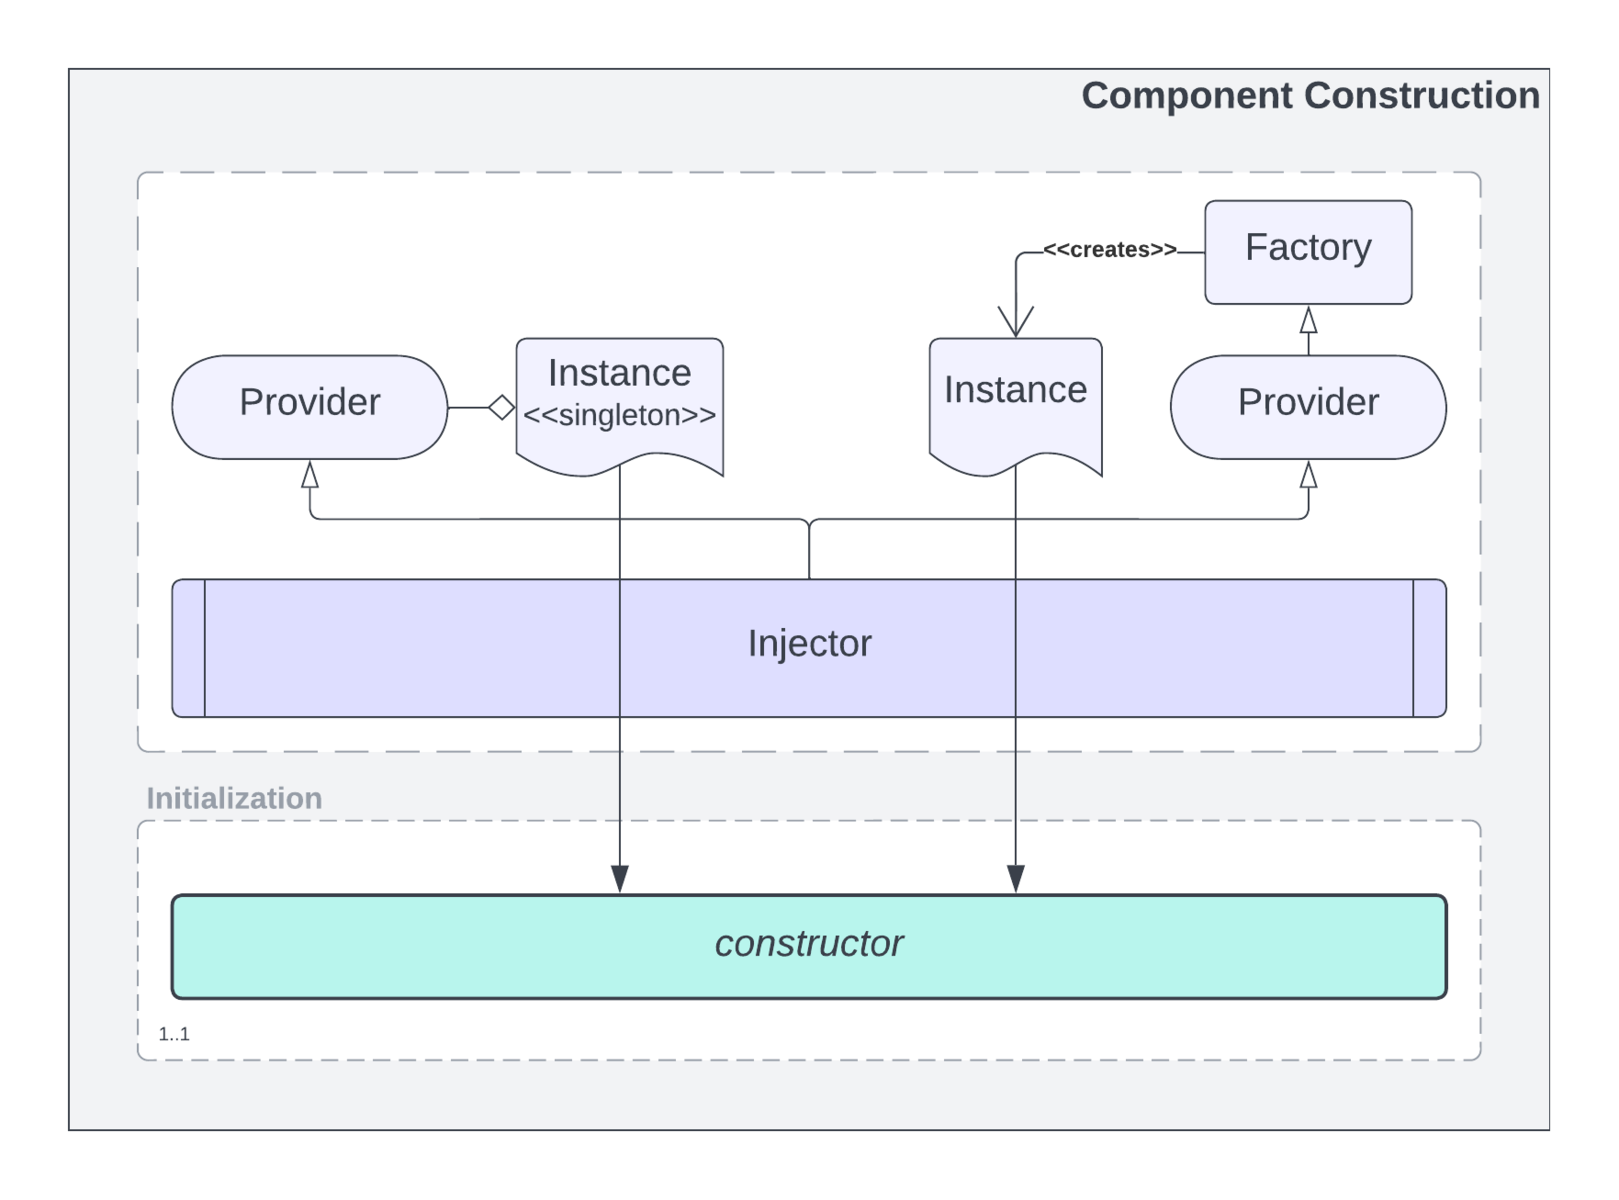
}Dependencies
Construction of an Angular component is the moment when any dependencies the component has are provided. Providers are inquired, via the Angular Injector behind the scenes, to retrieve dependency instances. These dependencies are then passed into the component’s constructor.
Building Forms
In some cases, you may find that building your forms in the constructor is the optimum time, and may allow you to temporarily leverage say a FormBuilder only within the constructor. It may not be possible to build every form this way, and in some cases you may have to build your forms later, such as in the ngOnInit event. This may occur if you require data from component inputs in order to build your form properly.
One of the benefits of building the form in the constructor is it can keep the overall complexity of the component very low. You would not need to import the OnInit interface, nor implement the ngOnInit event handler method. For simple components, this can help keep the volume of code down.
Routing and “Current Navigation”
When routing in Angular, there is a stage of the process where routed components are constructed. This process occurs during routing, not before or after. Routing, then, is one of the processes that can “give birth” to the component and its lifecycle. When routing in Angular it is possible to attach extra details to a given routing attempt. Some of these details are only available while routing is still in process. This “current navigation” may only be accessed via the Router within the constructor of the component being created.
export class PageComponent {
    constructor(router: Router) {
        this.routingState =
          this.router.getCurrentNavigation()?.extras.state
            ?? { ... };
    }
}
Note that in some cases, a component, depending on its purpose and usage, may not be able to access the current navigation. Routing is not the only thing that may construct a component…child components may be created by the view engine as part of the subsequent lifecycle of a routed component.
The bootstrap component (usually AppComponent) initialization will result in the app component being created initially before any routing occurs by the bootstrapping process in Angular. Dynamic components may be constructed on demand at other times during their parent component’s lifecycle, often in response to changes in other data or events.
Children
The children of a component you route to may be created at different stages of the parent’s lifecycle. For static components, those without any dynamic traits such as the use of *ngIf, they will be constructed during the construction cycle of their parent.
When it comes to dynamic components, they may be constructed and destroyed again and again depending on how they are involved in the display of the view. Components with *ngIf for example will be constructed when the expression evaluates true, and will be destroyed and removed when the expression evaluates false.
You will find similar behavior with [ngSwich] and *ngSwitchCase which also involve structural directives, and if you implement custom structural directives it may also be possible for child components to be constructed and destroyed at different times in the lifetime of their parent component.
Dynamic components will be constructed and will run through the standard angular lifecycle when they are added to the document (i.e. via *ngIf), and will be destroyed (this triggering ngOnDestroy) when they are removed from the document.
Adolescence: Component Initialization
Components grow to adulthood through the initialization cycle. Lets call that a component’s adolescence! Where once they were just an empty object, during initialization they acquire knowledge and grow…digital limbs! Initialization is a multi-part process, and is in fact the longest sequence of events in the Angular component lifecycle.
Initial Changes
The first thing that may happen during component initialization is the OnChanges event. If your component has inputs, the first call to OnChanges will be when the view engine binds all of the initial values for those inputs. This is also the key case where the SimpleChanges parameter of the ngOnChanges() method will represent more than one change, and they will all be the first change.
If your component does not have any @Inputs then this particular event handler will be skipped. It will only be called, before ngOnInit, if your component actually has any inputs that require binding.
To implement this handler, make sure you import the OnChanges interface and implements it on your component class:
export class MyComponent implements OnChanges {
    ngOnChanges(changes: SimpleChanges): void {
        // ...
    }
}
This event handler accepts a single optional parameter: changes of type SimpleChanges. This is a dynamic object that contains a few key pieces of useful information about each input property:
interface SimpleChanges {
  __index(propName: string): SimpleChange
}

class SimpleChange {
  constructor(previousValue: any, currentValue: any, firstChange: boolean)
  previousValue: any
  currentValue: any
  firstChange: boolean
  isFirstChange(): boolean
}
Whenever an input changes, you either will know it is the first change of that input and the current value, or you will know its previous as well as current values. Knowing the previous value is often critical to performing effective change handling.
Initialization
The quintessential initialization event handler, ngOnInit is actually not guaranteed to be the first event handler that is fired during the initialization process. If your component has inputs, then ngOnChanges will of course be called first during that initial population of inputs.
After ngOnChanges has been triggered, if it needed to be, then ngOnInit will be triggered. Since this event occurs after inputs nave been set with initial values, this handler will be able to access those values if necessary to perform the required component initialization.
It is important to note that initialization is “early” in the process. After inputs have been set, but before child components have been constructed and initialized. As such, the OnInit handler is not a viable option for any kind of initialization logic that depends on the existence of child components. For that, you will need to use content and view initialization handlers.
To implement this handler, import the OnInit interface and implements it on your component class:
export class MyComponent implements OnInit {
    ngOnInit(): void {
        // ...
    }
}
Custom Change Detection
As mentioned earlier in the article, in Angular we have changes, and we have the checking process that determines what has changed. If you have custom change detection requirements, as in you need to compare things in ways other than simply referentially, or if you need to compare things that are simply not ever going to be involved in Angular’s default change detection pipeline, then you need to implement custom change detection via DoCheck and the ngDoCheck handler.
export class MyComponent implements DoCheck {
    ngDoCheck(): void {
        // ...
    }
}
It should be noted that Angular will…CAN…only call ngDoCheck if something has otherwise triggered a change detection cycle! That includes initialization, as well as other standard change events such as an input changing, or a host listener responding to a host event.
If you require totally custom change detection TRIGGERING, then you will have to trigger it yourself. More on this later on in the actual change detection cycles part of the article.
Classic Components
If you write a lot of classic Angular components, where the app and all of its logic generally live within the components, and maybe a few services, then you may find the occasional need for custom change detection. This would generally be any time you are tracking “old” vs. “new” values yourself via additional properties, or need to compare bound input properties to non-input data.
The Angular documentation has a good little example of how to perform custom change detection with their classic Heros example components. To avoid reinventing the wheel I’m simply going to link that here.
Most examples of custom change detection in online articles are fairly contrived, as the need usually does not arise often. When the need truly does arise, the implementation details are usually quite implementation specific and often a good deal more complex than any available examples.
I would encourage readers to strive to leverage existing standardized change detection mechanisms in Angular as much as possible. Not only is this more understandable for other developers and maintainable in the long term, it runs a lower risk of breaking with future Angular releases. Suffice it to say, this lifecycle event IS your key opportunity for handling synchronous custom change detection, if absolutely necessary.
Reactive Components
If you are writing modern, reactive components that are primarily driven by RxJs observable streams, or with NgRx (which is ultimately RxJs under the hood for things like selectors), then you may find that you very rarely if ever need to implement custom change detection. Your application is inherently reactive, and most such change detection and management should be done within observable pipes as much as possible anyway.
Projected Content Change Management
After core initialization and initial change detection (default or custom), the next key phase of the component initialization process is content projection and its change detection and checking.
Content projection is the mechanism by which Angular allows components to accept custom child HTML content and place it where it wants within its own template. AngularJS developers would have called this “transclusion”, and is largely the same general concept: parent component uses a child component, and passes markup into that child component (more HTML markup and potentially other angular component usage between the starting and ending elements of the original child component.)
<my-component>
  <my-button (click)="parentsOnClick()">
    Further Nested Child Content!
  </my-button>
</my-component><button class="my-button">
<ng-content></ng-content>
</button>Angular content projection is very powerful, and is a wonderful way of developing flexible, templated components that allow the projection of one or more aspects of nested content into a child component.
Such projected content is not available by the time ngOnChanges or ngOnInit are called within the initialization process. Projected content may involve the construction and initialization of other Angular components, which must occur first before such content is actually available for reference within the current component.
After Content Initialized
Once any projected child content and components have been constructed and initialized, it will be available first within the ngAfterContentInit handler. Implement the AfterContentInit interface to gain access to this method:
export class MyComponent implements AfterContentInit {
    @ContentChild(MyButtonComponent) button!: MyButtonComponent;

    ngAfterContentInit(): void {
        // this.button is available now
    }
}
After Content Checked
Remember that checking is the actual act of performing detection of changes in Angular. Within the initialization cycle of a component, the *Init handlers are the moments at which child or view content is actually available for use (won’t return undefined), however, it is with the *Checked handlers where actual change detection occurs.
When the ngAfterContentChecked handler is called during the initialization cycle, any changes (i.e. input binding) for those children has occurred, and those changes will be available for reference in the current component. Implement the AfterContentChecked interface to gain access to this method.
export class MyComponent implements AfterContentChecked {
    @ContentChild(MyButtonComponent) button!: MyButtonComponent;

    ngAfterContentChecked(): void {
		// this.button will reflect initial changes on inputs, etc. now
    }
}
View Initialization Change Management
After content checking, the next key phase of the component initialization process is view initialization and their change detection and checking. Angular leverages uni-directional data flow, meaning data and change flows from parent components “downward” into child components. If a child component, or any form of custom change detection, would result in a parent component changing after it’s been checked, that would violate unidirectional data flow rules.
The AfterViewInit and AfterViewChecked events allow us to manage cases where a child view or custom change detection might result in the need for a parent to change. Much of the time, this will require, one way or another (and there may be many ways to tackle this particular problem), waiting to initiate certain changes for a change detection cycle, ensuring that parents do not change after they have already been checked in a given cycle.
After View Initialized
Once a components child views have been created, it will be available first within the ngAfterViewInit handler. Implement the AfterViewInit interface to gain access to this method:
export class MyComponent implements AfterViewInit {
    @ViewChild(MyChildView) childView!: MyChildView;

    ngAfterViewInit(): void {
        // this.childView is available now
    }
}
Before this event is fired, the childView would not be available (it would return undefined, unless otherwise initialized to some alternative default value.)
After Content Checked
Once the view has been initialized, you may then access it, and any public properties or methods it has, within your parent component. Note that this is where one potential for “changed after checked” issues can arise. If you make changes to your parent component while initializing the views, then you will have indeed changed the component after it was checked…remember, checking described above has already occurred at this point!
If you need to make changes to your parent, just make sure you do so in a manner that will apply those changes in the next (or a later) change detection cycle.
The ngAfterViewChecked handler is called during the initialization cycle once child views have been checked. You are then free to access those child views and their state. Implement the AfterViewChecked interface to gain access to this method. In this example, the parent component’s property changes based on child components’ properties. We use setTimeout to avoid a change after checked error:
export class BudgetManager implements AfterViewChecked {
  @Input maxBudgetAllowance: number = 0;

  @ViewChild(BudgetEntry) budgetEntry1!: BudgetEntry;
  @ViewChild(BudgetEntry) budgetEntry2!: BudgetEntry;
  @ViewChild(BudgetEntry) budgetEntry3!: BudgetEntry;

  showAllowanceExceededWarning = false;

  ngAfterViewChecked(): void {
    const summedTotal = this.budgetEntry1.total +
                        this.budgetEntry2.total +
                        this.budgetEntry3.total;

    setTimeout(() => {
      this.showAllowanceExceededWarning = summedTotal > this.maxBudgetAllowance;
    }, 0);

  }
}
This approach ensures that the change, to a flag that the template may use to determine whether to show a warning about the budget allowance being exceeded, is not applied in the current change detection cycle…after the parent component (who’s code is shown above) was checked.
Now, this is a bit of a contrived example, and this particular use case might be better suited by leveraging @Output properties on the child components, and gathering up the changes from those outputs in order to determine whether to show the allowance exceeded warning or not. This does show however that custom change management can be safely implemented within the Angular component lifecycle.
Another useful case for after view checked is when you need to interact with the contents of the view, or its child views. One simple example would be if you need to scroll to a particular element, once the view has been fully rendered. You cannot scroll at any earlier opportunity, so you must wait until the view is fully rendered in order to target the element you wish to scroll to, and then trigger scrolling.
export class BudgetManager implements AfterViewChecked {
  @ViewChild('scrollTarget', {read: ElementRef}) scrollTarget!: ElementRef;

  ngAfterViewChecked(): void {
    this.scrollTarget.nativeElement.scrollIntoView({ behavior: 'smooth' });
  }
}
When scrolling to an element, it may also be possible to scroll in the AfterViewInit handler. It may depend on whether you need your child views to be fully checked and rendered, which may affect document length, before you scroll. Consider this potentiality for other possible use cases of the AfterView* events.
Life: Change Detection
Once a component is fully initialized, it’s reached adulthood. Like most adults, components have eventful (ha!) if often somewhat mundane lives. They do the same things…over…and over…and over. Change is their job! Component adulthood is an endless loop of waiting for input, and responding to such input through a series of repeatable event handlers.
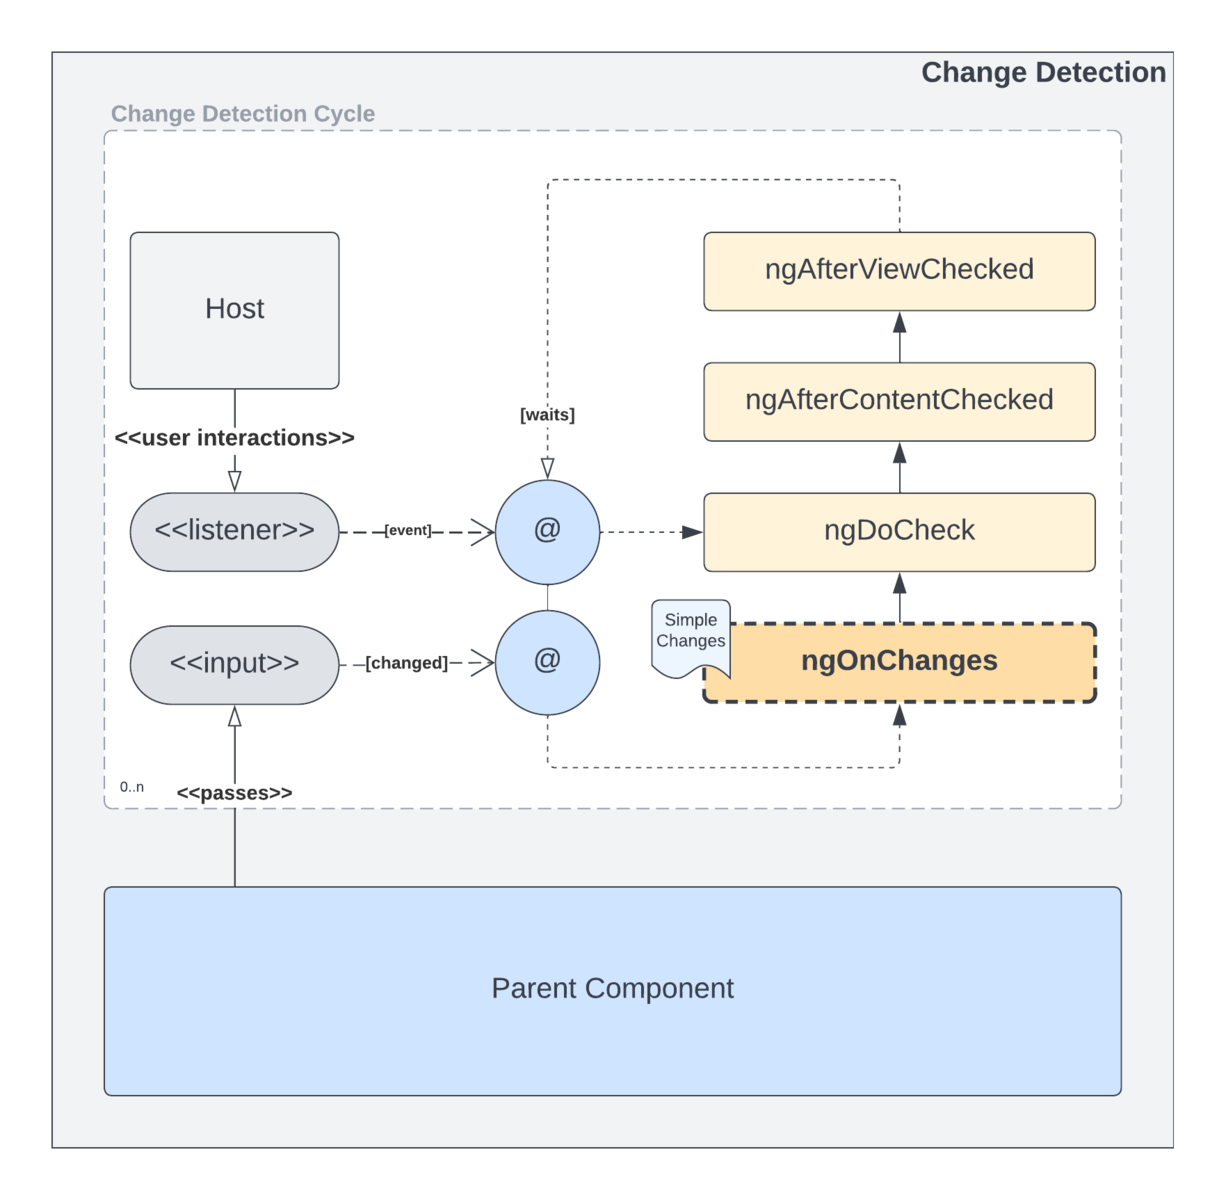
Input Changes
The most recognizable aspect of change in an Angular component are @Input changes. Any component that has one or more inputs will kick off the change detection cycle. When an input changes, the cycle will begin with the OnChanges event, and then progress through DoCheck, AfterContentChecked, and finally AfterViewChecked. These are the same events described as part of the initialization phase.
Input changes are governed by the parent component. When a parent decides to input a value to a child component, that will result in a change to that child component. It should be noted that, during the change detection cycle, each change to each single individual input will trigger a change detection cycle…input changes are not bundled!
Handling Changes to Inputs
To handle changes to a component’s inputs, you must implement the OnChanges interface by adding an ngOnChanges method to your component. This method was originally described above with the initialization phase. To further expound upon its capabilities, an optional SimpleChanges parameter may be passed to this function. This object contains details about the change that has occurred for the give @Input property, and can allow comparison of the current vs. prior value:
export class MyComponent implements OnChanges {
    @Input name: string;

    ngOnChanges(changes: SimpleChanges): void {
        if (changes.name.previousValue === changes.name.currentValue) {
          alert('You must input a different name!');
        }
    }
}
Note that
changesis a dynamic object, and will contain properties with the same names as the inputs that have changed.
Host Listener Changes
Another potential trigger of the Angular change detection cycle are host listeners. These are less commonly used than @Input, however are a powerful tool in the Angular decorator toolbox. A host listener, implemented via the @HostListener decorator, allows you to bind a handler to one or more standard HTML DOM events, such as mouse movements, keyboard interaction, etc.
The “host” is the root element of the given component, and thus, unless you explicitly bind to document:<event> or window:<event> level events, will only handle events specific to the host’s context.
Any events emitted by the listeners you have bound will also trigger a change detection cycle, however these cycles involve one less event than the more common @Input cycles: They start at DoCheck and skip the OnChanges event.
Death: Component Destruction
When a component’s useful life has been exhausted, one of a few key events will trigger its ultimate demise: destruction! Sorry components, no easing lazily off into the sunset through seniority for you! When your usefulness ends, its straight off to the chopping block!
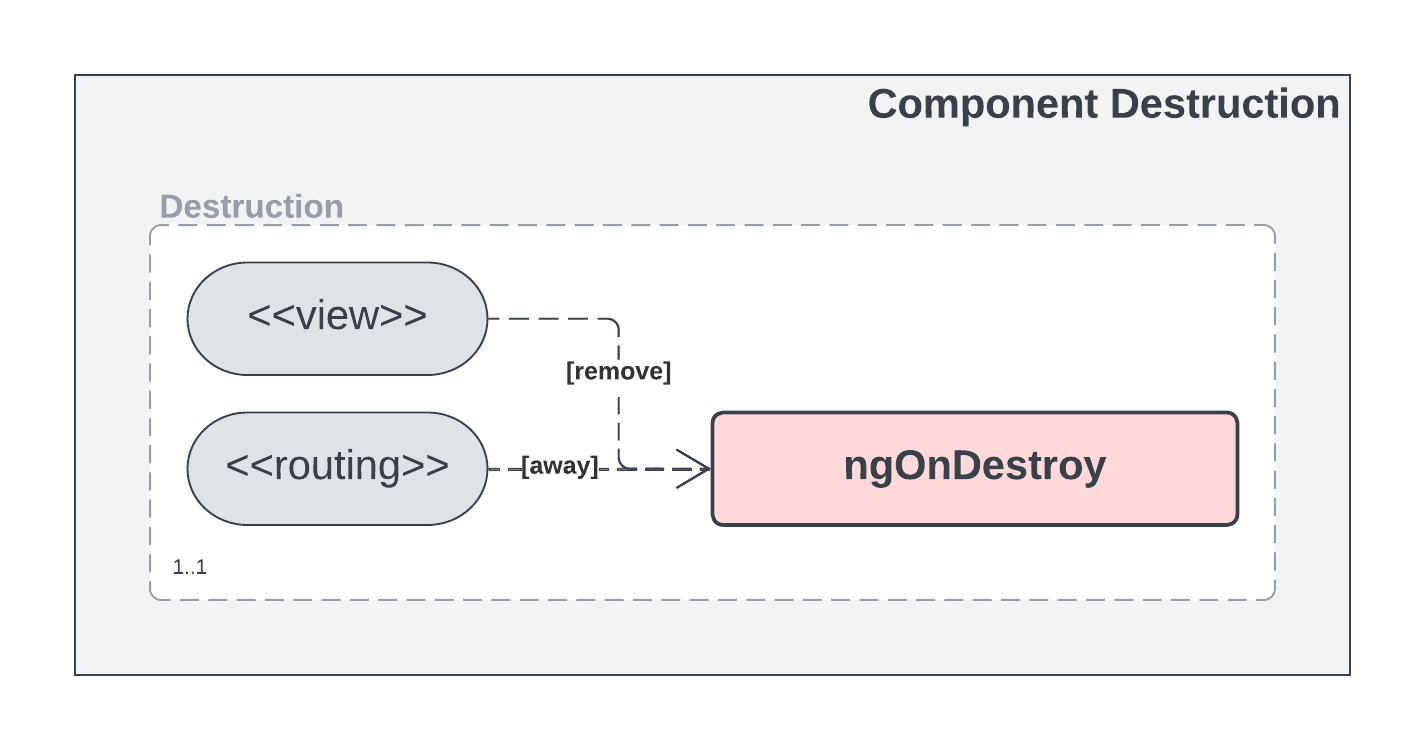
It should be noted that destruction of an Angular component is an independent process. It is not arrived at as a part of either the initialization process, nor the change detection cycle. “External” triggers, such as removal of a component from the DOM or navigation to another route, will cause the destruction of a component.
Navigating Away
The first of two key potential triggers of component destruction is navigation. When navigating away from one page to another at a different route, any components on the prior page will be destroyed first. Even if the destination route will need to use some or all of the same components, new instances will be constructed to support the new page and all of the components involved at the target route.
It should be noted that there are a couple of cases where components may not be destroyed as a result of navigation. First, if the route is the same except for its parameters, then navigation will not actually destroy all components. It may cause changes that result in child components to be created and destroyed, but that is a result of reactive behavior that may result in changes to inputs, or as a result of structural directives, etc.
Further, if a view is using Angular’s multi-output routing functionality, then only outputs that change as a result of routing will in fact result in the destruction of any prior components. Any other outputs that do not change, will not result in destruction of the components within. As a side note, with some frameworks built on top of or that support Angular, such as Ionic, it is entirely possible that the application may maintain more than one route active at a time. With custom routing solutions, keep in mind that destruction may occur on a non-standard schedule.
Removal From Document
The other key trigger for destruction of components within a view is document structure changes. This results when DOM elements are removed from the document, and the most common case where this can occur is with structural directives such as *ngIf , *ngSwitchCase , etc. Other structural document changes can occur as a result of using ng-container and ng-template along with custom behaviors within a component. In general, anything that results in a component’s element being removed from the document, will result in that component being destroyed.
Components that are removed, then later added back (i.e. if the boolean value of an *ngIf changes to false then back to true ), the original component instance WILL be destroyed on false , and a NEW instance will be created on true .
Handling Component Cleanup
Death! Its a messy business! You’ve got the estate to deal with, burials to attend to, and of course, when a component dies, so do all his friends!! The OnDestroy event is the undertaker for the graveyard of dead components! Within the handy ngOnDestroy method, you have the opportunity to take care of all those gritty details of death, and give your components a dignified burial.
Some things in the world of Angular are automatic. If you create certain things, and use them properly, Angular will take care of them for you. As one prime example, any Observable piped through the Angular async pipe will be automatically cleaned up when the component reaches its end of life. On the other hand, many things must be dealt with explicitly and manually…such as, for a keen counterexample, manual subscriptions to observables within the component source code.
Keep an eye out for things you may be constructing, creating, binding or subscribing to, etc. in your components. Many of them may well be long-lived, and some may in fact live long after the death of your component. In fact, once your component has lived its life and moved on, you may leak certain things forever. Continuing with our prime example, any manually subscribed observables must be cleaned up in one way or another when the component is destroyed. The ngOnDestroy method is the one place where you can make sure that happens.
A possible use case:
@Component({...})
export class MyComponent implements OnDestroy {
  get records$(): Observable<{ integer: number; name: string; eol: Date }> {
    return data$.asObservable();
  }

  private data$: Subscription<{ integer: number; name: string; eol: Date }>;
  private destroyed$ = new Subject<boolean>();

  constructor(private readonly store: Store) {}

  ngOnInit(): void {
    combineLatest([
      this.store.select(integers),
      this.store.select(names),
      this.store.select(dates)
    ]).pipe(
      map(([integer, name, eol]) => ({ integer, name, eol })),
      takeUntil(this.destroyed$) // Cleans itself up when this "signal" is emitted
    ).subscribe(data$);
  }

  ngOnDestroy(): void {
    // Trigger cleanup of streams by emitting destroyed "signal"
    this.destroyed$.next(true);
  }
}
Conclusion
There you have it, folks!! The wonderful, eventful lives of Angular components! What may have once seemed mundane, is now revealed as the interesting and complex dance that it really is! Hopefully this article has not only introduced you to the Angular component lifecycle in general, but also exposed you to some of the more esoteric use cases and possibilities that lie within these handful of events.